Independent comparisons. We may earn from shop links. More info

How to use a router table

Updated: 21 October 2026

You are mounting a router under a benchtop in a UK garage, and you want the first moulding to stay on the table. How to use a router table comes down to a flush plate, a square fence, and a feed from right to left. Peter F. wrote this from public UK guidance and amazon.co.uk listings captured on 19 October 2026, without a lab test. If you have not chosen a bench yet, use the [router table comparison](/hub/routers/router-table), and check fit and voltage in the [router table buying guide](/hub/routers/router-table/sub/router-table-buying-guide). A qualifying purchase through our links can earn a commission at no extra cost to you.

You are mounting a router under a benchtop in a UK garage, and you want the first moulding to stay on the table. How to use a router table comes down to a flush plate, a square fence, and a feed from right to left.

Our top picks

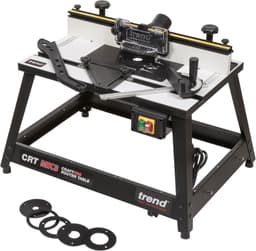
Trend Trend CRT/MK3

Best overall

Trend Trend CRT/MK3
9.0/10about £258.55
Charnwood Charnwood W012

Best value

Charnwood Charnwood W012
8.0/10about £88.50
Trend Trend WRT

Rank 3

Trend Trend WRT
8.6/10about £349.44
On this page

Mount the router and level the plate

Unplug at the wall before you remove the router's base plate. On the Charnwood W012 the stated clearance is about 260 mm and the face plate about 190 mm, so a large 1/2 inch body can foul the underside. With the plug out, mark the undrilled insert through the router's existing holes, countersink the screws below the face, and tighten in a cross pattern so the plate cannot rock. Lay a steel rule across the insert, and shim a low plate with paper or tape, as review notes on the W012 describe. A proud lip snags the timber, and a dip lets a narrow edge fall in, so fit the smallest ring the cutter will clear. Stop if the plate is cracked or the holes will not match, and leave that to someone who already mounts routers. Dust class and the no-volt switch are on the router table dust and safety page. When the rule shows no step, set the fence to the cutter.

Set bit height and fence

Fit the cutter with the plug out, and set the height from the table surface, because a scale zeroed on the old base is wrong once the insert is in the stack. Take one short pass on a scrap of the same board before the finished piece. The SKIL SRT1039 adds a winder above the top, but that listing is 120 V, so a pin adaptor does not make it a 230 V UK bench. Square the fence to the top and keep it parallel to the mitre slot, or a long rail will taper. A light round-over that still bears on the uncut face can use one cheek. When the bit removes the whole edge, the outfeed cheek has to meet the new face or the end will dip and burn, and a one-piece fence does that less well than split cheeks. Fix a fence that will not lock square before you take a deeper pass.
Trend Trend CRT/MK3

Testsieger

Trend Trend CRT/MK3
9.0/10about £258.55

Hold-downs and starter aids

Featherboards and a push stick keep your hands off the cutter once the fence is locked. Press the stock down and into the fence ahead of the bit, because pressure aimed into the cutter will grab even on a correct feed. The W012 is listed with a featherboard and clamps, and the CRT/MK3 and WRT listings include finger boards and a push stick. Use the push stick for the last few centimetres, and keep the stick on the timber so you do not lever the work off the cheek. The lead-on pin is for a curve: rest the piece on the pin, then pivot into a bearing-guided cutter, and leave the pin out for a straight moulding. If the blank is shorter than the gap between the cheeks, rout it on a longer piece and cut it to length afterwards.

Feed direction and passes

Move the timber from your right to your left. From above, the cutter turns anti-clockwise, so that feed works against the rotation. Wealden's safe-use note says to feed right to left and not to climb cut, because the other way lets the bit throw the work along the fence. Do not draw the stock back while the bit is spinning. Start a bookcase shelf at the right-hand end and clear the cutter in shallow passes, not one full-depth cut. Take a light first pass as a rule of thumb, then raise the cutter a little with the plug out, because no single depth suits every bit. A full-depth ovolo in oak is the usual grab. A large panel is often steadier handheld, as router table versus a handheld router explains, and fire-door work needs a competent person.

After the cut

Stay with the push stick until the spindle stops, because a coasting bit still throws a small offcut. Leave the dust hose on the fence while you clear chips, and do not brush the opening with the hose off and the cutter exposed. Suitable extraction at work is on the dust and safety page. Change the bit or the fence only with the plug out of the wall. Use a no-volt release if the table has one, so a router left on cannot restart when power returns. The W012 does not include that switch, and tape on a trigger is not a substitute, which is Wealden's warning. Before the next piece, recheck the plate, the fence, the featherboard, and the ring.

Common questions

Which direction do I feed stock on a router table?
Feed from right to left as you face the fence. From above, the cutter turns anti-clockwise, so this feed works against the rotation. The opposite direction is a climb cut and can throw the timber. Do not pull the work back while the bit is still spinning.
How do I level the insert plate with the table top?
Lay a rule across the insert and the top. Shim a low plate with paper or tape until there is no step, then retighten the screws. A proud lip snags the timber, and a dip lets a narrow edge fall in. On the W012, level the insert before the first cut.
How do I set the fence for an edge moulding?
Square the fence and run it parallel to the mitre slot so a long piece does not taper. A light profile that still bears on the uncut face can use one cheek. If the whole edge is removed, support the new face on the outfeed side or the end will burn.
When do I use a push stick or a starter pin?
Use a push stick so your fingers stay clear of the cutter on the last part of the pass. Hold the wood against the fence with a featherboard ahead of the bit. Use a lead-on pin only to start a curve on a bearing-guided cutter. Leave the pin out when the fence guides a straight edge.
How deep should each pass be?
No single depth suits every cutter. Take a shallow first pass as a rule of thumb, then raise the bit a little with the plug out and repeat. If the router slows or the timber chatters, that pass was too heavy. Feed from right to left on every pass, including the last skim.
Do I switch the router off before changing the bit?
Pull the plug at the wall before you change a cutter, move the fence, or swap a ring. Use a no-volt release where the table has one, and do not tape a switch down. Wait until the spindle has stopped before you reach into the opening.
What if my router table plate is not pre-drilled?
The Charnwood W012 is sold that way. With the mains unplugged, mark the router's existing holes and countersink the screws below the surface. That bench is listed for about a 190 mm face, about 260 mm underneath, and cutters around 35 mm. If the holes miss, check the base in the buying guide before you drill.

Related pages

Sources

Public UK sources from the research digest, used for this page in October 2026. Prices, stars and review counts are from the five amazon.co.uk listings captured on 19 October 2026. HSE dust limits and PUWER apply at work. They are not a certificate for a domestic table.

  1. HSE, Wood dust (retrieved 19 October 2026)
  2. HSE, WD5 Routers (retrieved 19 October 2026)
  3. legislation.gov.uk, PUWER 1998 (retrieved 19 October 2026)
  4. Trend, CRT/MK3 240 V (retrieved 19 October 2026)
  5. Trend, The fixed router (retrieved 19 October 2026)
  6. Charnwood, W012 bench top router table (retrieved 19 October 2026)
  7. Wealden, Safe use of a router (retrieved 19 October 2026)
  8. Electrical Safety First, Travel advice (retrieved 19 October 2026)