Independent comparisons. We may earn from shop links. More info

How to set up a TIG welder

Updated: October 2026

When a new inverter arrives, the first useful result is not an arc. It is a gas path that seals, a sound electrical supply, and controls you understand. This page explains how to set up a TIG welder for an initial bead on clean scrap in a UK workshop. It does not replace the machine manual, an electrical assessment, or practical training. If the plug fuse is altered, or the manual asks for more than the socket can supply, stop before you switch on. What the four boxes actually include is on the [TIG welding machine comparison](/hub/soldering-and-welding/tig-welding-machine). We did not run a setup trial on these units. A qualifying purchase can earn a commission at no extra cost to you.

When a new inverter arrives, the first useful result is not an arc. It is a gas path that seals, a sound electrical supply, and controls you understand.

Our top picks

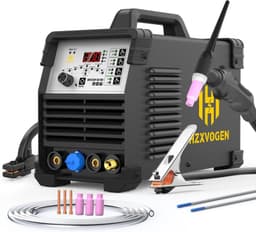
H HZXVOGEN H HZXVOGEN HVT250P

Best overall

H HZXVOGEN H HZXVOGEN HVT250P
9.8/10about £254.99
HITBOX HITBOX HBT250P

Alternative

HITBOX HITBOX HBT250P
8.6/10about £339.99
SSimder SSimder 140A (B0FVWWVWB1)

Alternative

SSimder SSimder 140A (B0FVWWVWB1)
7.6/10about £104.49
On this page

Connect and check the gas before the arc

Ordinary TIG work uses pure argon, not the argon and CO2 mix commonly sold for MIG. Confirm that the cylinder regulator suits the cylinder valve and that its outlet matches the machine hose without an improvised adaptor. The H HZXVOGEN listing names an argon hose. HITBOX and SSimder reviews include complaints about fittings or seals. None of that proves your regulator is included or compatible. If a thread does not mate cleanly, get the correct fitting rather than forcing it. Secure the cylinder upright, fit the regulator with the valve closed, and connect the hose as the manufacturer instructs. Open the cylinder valve as directed and check joints with approved leak-detection fluid, never a flame. A falling pressure reading, bubbles, or an audible leak means you stop, close the valve, and correct the connection. Argon is not flammable. It can displace oxygen, particularly in pits, tanks, and other enclosed spaces. Published setup notes give starting flows, not one legal UK setting. ESAB UK suggests roughly 6–10 litres per minute with argon and a standard cup. A hobby note at mig-welding.co.uk uses about 6–7 litres per minute. Start from the machine, torch, and cup guidance, and use only enough flow to shield the pool. Too much flow can pull air into the gas. Set post-flow long enough for the hot tungsten to cool under shielding. The useful check is that it is no longer bright when the gas stops. Never enter a vessel because it has been purged. HSE treats oxygen deficiency as a confined-space hazard and calls for testing from outside. Fuel tanks add fire and explosion risks this first-bead sequence does not cover.

Fit the torch, tungsten, and return lead

With the machine isolated, connect the torch and the return lead to the terminals specified for the process. For conventional DC TIG on steel and stainless steel, that normally means direct-current electrode negative. Follow the panel and the manual. Clamp the return onto clean, bright parent metal, or onto a sound welding table connected to it. Paint, rust, and a clamp through a hinge make an unstable return path. Fit a tungsten type and diameter the manufacturer permits. For DC work, grind the point lengthwise so the marks run along the electrode, on a dedicated wheel. Keep the tip clean and regrind it after it touches the pool. Some older guidance discusses thoriated tungsten, which needs particular care because it is slightly radioactive. Modern alternatives, and the maker’s recommendations, avoid casual grinding of an unknown electrode. Mild steel and stainless steel normally use DC. Ordinary aluminium TIG needs AC for oxide cleaning. A lift-TIG torch on a DC SSimder cannot add AC. If the workpiece is aluminium, check AC/DC or DC TIG before you set current or balance. If the machine supports a foot pedal, confirm the exact pedal is compatible. The H HZXVOGEN supports one and sells it separately. The HITBOX excludes one. For a first bead, panel control or a torch switch may be enough. Do not assume two similar multi-pin connectors share the same wiring.
H HZXVOGEN H HZXVOGEN HVT250P

Testsieger

H HZXVOGEN H HZXVOGEN HVT250P
9.8/10about £254.99

Control fume, arc light, and skin exposure

TIG can look clean because it produces less visible fume than some processes. Hardly visible does not mean harmless. HSE expects suitable engineering control for welding fume indoors, normally local exhaust that captures contaminants at source. TIG can also create ozone, especially around aluminium and stainless work. Smelling ozone is evidence that capture is not adequate. Outdoors, local extraction may be ineffective, so suitable respiratory protective equipment can still be required. Position the extraction so it draws fume away without pulling shielding gas off the weld. That balance is easier to set on scrap than on the finished part. Workplace systems, stainless, coatings, and confined areas need a task-specific assessment, not a desktop fan. If you cannot control fume without disrupting the shield, pause and seek competent advice. Wear a welding helmet with a suitable filter, safety glasses beneath it, flame-resistant clothing, dry welding gloves, and closed footwear. Cover exposed skin. TIG ultraviolet radiation can burn even when sparks are limited. Screens should protect other people. HSE points to welding curtains to BS EN ISO 25980. A helmet covers eyes and face. It does not control fume. Check the torch cable, return lead, insulation, connectors, and case before every session. Keep the area dry and clear of combustibles. If the machine arrives with wire across a plug fuse, an oversized fuse, damaged insulation, or a hot-smelling connector, isolate it and return it. That supply decision is on the TIG welder 13 amp plug page.

Make the first bead on scrap

Use clean scrap of the same material and a similar thickness to the eventual job. Degrease it, remove oxide or scale where required, and let volatile cleaner disappear before you weld. Place the return clamp on cleaned metal. Set process, polarity, starting current, and gas from the manual, not from a seller’s headline maximum. Before you strike, run the gas-test function if there is one, and repeat the leak check. Position extraction, lower the helmet, and start at a conservative documented setting. On lift TIG, touch as instructed and lift smoothly. On HF start, keep the recommended gap and use the switch. Stop if the arc is erratic, the tungsten discolours at once, gas flow fails, or any cable or plug heats unusually. Use the scrap bead to confirm that the gas shield stays stable, the tungsten stays clean, and the machine responds. Adjust one variable at a time. Do not use the valuable component as the diagnostic piece, and do not answer an electrical trip by fitting a larger plug fuse. If the machine is the wrong process, or the documentation is missing, the buying criteria come before any workaround.

Common questions

What gas should you use for TIG welding?
Pure argon is the normal starting gas for the steel, stainless-steel, and aluminium work discussed here. A MIG mixture containing carbon dioxide can contaminate the tungsten and the weld. Check the process guidance for specialist materials rather than treating one gas as universal.
What argon flow should you start with?
Published guides commonly suggest a starting region around 6–10 litres per minute with a standard cup. One hobby guide uses 6–7 litres per minute. These are practice ranges, not a British legal setting. Follow the torch and machine guidance, and avoid excessive, turbulent flow.
How long should post-flow run?
Post-flow should keep shielding gas around the tungsten until it has cooled and is no longer bright. Some tutorials use roughly one second per 10 A as a rule of thumb, but machine guidance and the tungsten’s appearance take priority. Too little post-flow can oxidise the hot electrode.
What should you do if the hose does not fit?
Close the cylinder and identify the regulator outlet, the hose, and the machine inlet before you buy the correct rated fitting. Do not force threads, use a flame to find leaks, or rely on an improvised seal. A connection that bubbles under approved leak-detection fluid has to be corrected before use.
Do you need extraction when you cannot see fume?
Yes. HSE treats welding fume as a health risk, and TIG can also generate ozone that is not made safe by low visible smoke. Indoor work normally needs effective local exhaust ventilation, with suitable respiratory protection where engineering control does not adequately reduce exposure.
Can you purge a tank and then climb inside?
No. Argon can displace oxygen, and a former fuel tank may retain explosive contamination. Confined-space entry and tank welding need a competent assessment, testing, and a safe system of work. Do not use a generic TIG setup article as a procedure for either task.

Related pages

Sources

HSE and British Standards pages, the R-Tech 13 A example, and the amazon.co.uk listings for these four ASINs. Listing snapshot 16 October 2026.

  1. HSE, mild steel welding fume (retrieved 16 October 2026)
  2. HSE WL3, welding fume control (retrieved 16 October 2026)
  3. HSE, asphyxiation hazards in welding (retrieved 16 October 2026)
  4. HSE, other welding risks (retrieved 16 October 2026)
  5. HSE, welding controls (retrieved 16 October 2026)
  6. BS EN IEC 60974-1, welding power sources (retrieved 16 October 2026)
  7. BS EN 60974-6:2016, limited duty equipment (retrieved 16 October 2026)
  8. R-Tech TIG 160 A, 13 A example (retrieved 16 October 2026)