How often to check a spirit level: practical triggers
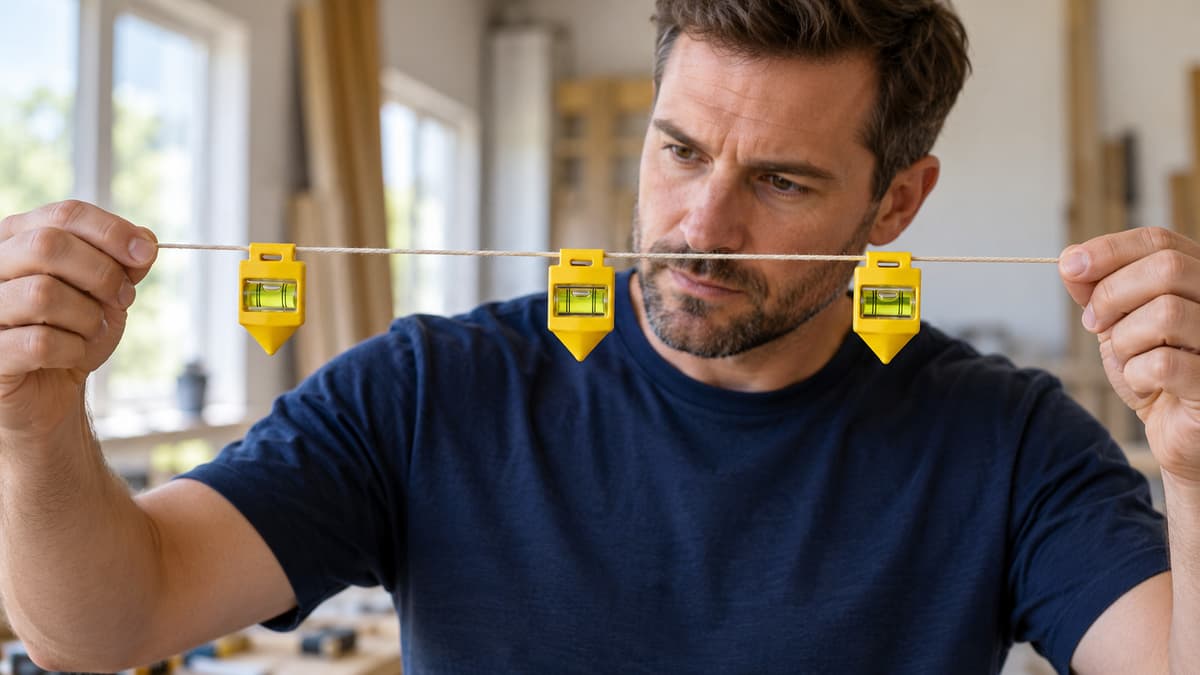
Learn when to check line levels, how to compare a multipack, and what to do after a drop, before a major job, or when bubbles on the line disagree.
On this page

In short
How often to check a spirit level depends on what has happened to it, not on a fixed monthly date. Check every line level when the pack arrives, after a drop or hard knock, before a job where a wrong datum would waste material, and whenever two readings disagree. For small hanging levels, compare every piece on the same taut line rather than assuming that one good vial proves the whole pack.
There is no monthly checking interval
A six-month or annual service date sounds tidy, especially when a multipack sits in a toolbox. The listings considered for these inexpensive levels give no recheck period and no calibration interval. An invented date can create false confidence: a level dropped tomorrow may be less trustworthy than one stored undisturbed for two years.
An event-based schedule is more useful. A UK tool guide recommends checking a level when it is new, after a knock and at the start of a major job. Those are practical triggers, not a British Standard inspection interval. You are checking a working indication, not certifying laboratory performance. A level carried loose with hammers may need several checks in one project. A protected tool used for occasional garden work may go months without a trigger. If an error would be costly, check immediately before the critical line.
The first check matters most with a pack of string spirit levels. A multipack only shows disagreement if you test every piece. Leaving that until halfway through a fence run turns a day-one return into an argument about which section is wrong.
When to check your line levels
Check a new pack before you remove labels, lose the packaging or mix the pieces with older levels. Keep them in order and mark them discreetly as A, B, C and so on, so you do not retest one level while missing another. The same comparison is worth repeating whenever one of these things happens:
- The pack has just arrived, and the pieces are still identifiable
- Any fall, even when the plastic body looks intact
- A long run of posts, a drainage reference, or any mark you cannot easily undo
- A familiar setup that suddenly seems out of level
- A toolbox rattling in a van, prolonged heat, or a large temperature change
An impact can shift the vial, the housing or the way the hooks seat. A drop onto concrete deserves more suspicion than a short fall onto grass, and appearance alone cannot confirm accuracy. When the work is difficult to reverse, verify the level before the first cut, hole or fixing.
If a familiar setup suddenly seems out of level, do not move the work to satisfy the bubble. Inspect the line for sag, movement and contact first. How to stop a builders' line sagging covers the line itself. Then reseat and reverse the level. If another piece disagrees, compare the whole set. After harsh storage or a temperature change, let the tool and the setup settle before you judge the bubble.
How to check every level in a pack
Choose two firm supports and attach a clean line between them. Pull it taut enough to minimise visible sag, without overloading the supports or using a string that stretches unpredictably. Keep the supports, tension and test position unchanged. Consistency matters more than an elaborate rig.
Mark a short section near the centre. Hang the first level from its hooks, let the bubble settle and note it against the vial marks. Then hang each remaining level in the same place and orientation. A square-on photo makes a small disagreement easier to review. An angled view introduces parallax.
Then reverse each line level end for end in the marked position. The hooks and the balance are part of the test, because a hanging tool is not supported on a flat sole. If the two directions disagree, reseat it and repeat. A persistent change is a warning, not something to average away.
For a full-size level with a flat working sole, note the bubble on a stable surface, rotate the tool through 180 degrees in the same place and compare. Stabila's guidance explains this reversal and notes that a small shift can fall inside a stated tolerance. Do not transfer that flat-sole method to a hanging line level. Test the latter the way it hangs in use.
A trusted reference strengthens the result. Several pieces in a pack may agree and still share the same production or setup error. Compare the line with a known instrument when the job needs more confidence. The line-level buying guide helps you judge whether this compact tool suits the work.
What disagreement between levels means
When readings differ, check the setup before blaming a vial. Every hook should be clean, fully seated and free from moulding debris. Look for a twist, knot, frayed section or contact point, and for wind or vibration. Change only one factor at a time. If the pieces still disagree, see why line level vials in one pack disagree.
Separate repeatability from absolute accuracy. If one level returns to the same position every time but differs from a reliable reference, it may be consistently wrong. If its reading wanders each time you rehang it, poor seating, line movement or damage may be responsible. Neither behaviour supports using it for a critical datum.
Do not average the pack. Isolate the outlier, mark it and retest it against the same reference. Majority agreement is not proof that the cluster is accurate.
Suppose six levels appear centred and one sits to one side. Averaging them hides the failed piece. If the six agree only roughly, question the test and the published tolerance instead of declaring the largest cluster correct. A change in line length, tension, support stiffness or viewing angle between days can also create a shift that did not come from the level. The pack check is a same-condition comparison. It does not turn inexpensive vials into certified instruments.
Tolerance does not replace checking
Accuracy figures need units and context. Stanley lists its 0-42-287 line level at 2 mm/m, and the same UK product table says that an accuracy or vial warranty is not provided. That model is not evidence for every multipack. It shows why you should read the actual specification instead of assuming that all small line levels share one standard.
A stated tolerance permits a limited difference. It does not make every shift acceptable. Judging compliance needs a method that can resolve that figure over a known distance. A short casual setup may show a badly displaced vial and still miss a small error. If the work depends on a quantified accuracy, use an instrument specified for that demand.
The opposite problem arises when a pack states no millimetres-per-metre figure. You cannot excuse disagreement by claiming it must be within tolerance when no tolerance has been published. You can still assess whether the levels agree, reverse consistently and are useful for the task, and describe that honestly as a practical comparison.
Checking a level differs from checking a square. A try square comparison concerns a 90-degree relationship, while a line level responds to gravity. One test cannot validate the other, and neither should borrow a specification from an unrelated product.
What to do when one level fails
Take the suspect piece out of service. Clean it, inspect the body, vial and hooks, then repeat the same-position and reversed tests after the setup has settled. If it still disagrees with the reference, or changes when reversed, mark it so it cannot drift back into the working pack.
Most inexpensive moulded line levels offer no documented user adjustment. Packing the vial by guesswork may improve one test and leave an unknown error elsewhere. Unless the manufacturer gives a calibration procedure, you can identify a problem without having a valid way to correct it.
For a new pack, a persistent outlier is usually a return or replacement question. Keep your photos, notes, packaging and proof of purchase, and follow the retailer's process. Repeatable disagreement under the same conditions is enough. Do not claim a precise calibration failure unless your method supports it. For an older inexpensive pack, replacement is often more proportionate than professional calibration. A precision site level can justify manufacturer service where records are required. Match the remedy to the consequence of a wrong reading.
Common questions
How often should I check a spirit level?
Should I check every line level in a multipack?
Can I use a flip test on a line level?
Does temperature affect a spirit-level bubble?
Does a stated accuracy remove the need to check?
What if only one level in the pack disagrees?
Do cheap spirit levels need calibrating?
Who can check a precision site level?

Peter F. is the editor for DIY & tools at productscompared.co.uk. Comparisons in this category are checked against amazon.co.uk listings, review evidence and public UK sources.
Related articles

Line levels not reading the same: test the pack
A shared box does not mean every vial agrees. Hang each piece on the same taut line.

Builders line sag: how to keep your line true
A dipping builders' line moves the bubble. Tension, supports and line weight come first.
Consumer Rights Act faulty goods: your 30-day rights
A new level that fails a careful check is a faulty-goods question, including the 30-day right to reject.