Independent comparisons. We may earn from shop links. More info

How to use a combi drill

Updated: 22 October 2026

The first screw is a hinge on a kitchen cabinet, the collar shows numbers plus a drill symbol and a hammer symbol, and a click from the front end sounds as if something has snapped. That click is usually the clutch doing its job, or the wrong mode doing damage. This is how to use a combi drill for that screw and the next hole: which mark on the collar, which gear, and when to take your finger off the trigger. The [combi drill comparison](/hub/drilling-and-accessories/combi-drill) is where the kits differ. This page does not rank them. If you are still choosing the carton, use the [combi drill buying guide](/hub/drilling-and-accessories/combi-drill/sub/combi-drill-buying-guide) first. A qualifying purchase can earn us a commission at no extra cost to you.

The first screw is a hinge on a kitchen cabinet, the collar shows numbers plus a drill symbol and a hammer symbol, and a click from the front end sounds as if something has snapped.

Our top picks

On this page

The collar and the gear switch

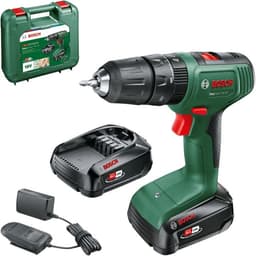
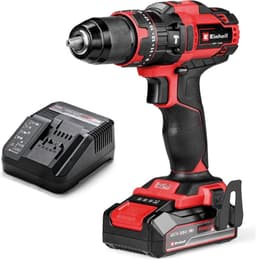
A combi collar has three ideas, even when the printing differs. The numbers are the slipping clutch, and they are for screws. The drill symbol locks that clutch out so the chuck keeps turning for a hole in wood, metal or plastic. The hammer symbol adds percussion, and it belongs with a masonry bit in masonry only. Beside the collar is a 1/2 switch, or a similar gear selector. Gear 1 is slow and stronger. Gear 2 is faster. They are not the same control as the numbers. Turning the collar to a higher number does not change gear, and flicking into gear 2 does not set a clutch. In this set the collars are not one shared scale. The BLACK+DECKER has 10 settings, both DeWalt kits have 15, the Bosch EasyImpact 18V-40 and 18V-38 have 20, the Einhell has 21, the Ginour bullet says 23, the Ryobi has 24, and the LEEIKOO bullets say 25, with one of them printed as 25+3. A 5 on the BLACK+DECKER is not the same torque as a 5 on the Ryobi, and none of those numbers is a newton metre. Stop the chuck before you move the collar, the gear switch, or the forward/reverse slider. Changing gear while the chuck is still spinning is how the gearbox gets damaged. Centre the direction switch as well, so a bump of the trigger does not start the chuck in your hand.

Driving a screw without stripping it

Put the clutch on a low number, select gear 1, and fit a driver bit that actually matches the screw head. A Phillips bit in a Pozidriv screw will cam out and chew the recess, which feels like a clutch problem and is not one. Start lower than you think you need. Drive one screw into a scrap of the same timber, or into the least visible hole, and step the collar up one number at a time until the head sits flush and the clutch clicks as it finishes. If the head stops proud and the clutch is already clicking, the number is too low. If the screw keeps turning and the timber tears, the number is too high, or you are no longer on a number at all. Forward drives the screw in. Reverse takes it out. The mistake that strips heads is drill mode: the drill symbol locks the clutch, so the motor will keep going after the head has seated. On a brass hinge screw that takes about two seconds to seat, that extra half-second in drill mode rounds the head. On a long coach screw into a joist you may need a higher number, or even the drill symbol for the last part of a structural screw the maker says to drive that way. Read the screw packet. Driving a masonry screw is still clutch work, and the hole itself is the combi drill for brick page.

Drilling wood, metal and plastic

For a hole, move the collar off the numbers and onto the drill symbol, so the clutch cannot slip halfway through. A 4 mm pilot in softwood for a hinge screw is gear 2, a brad-point or a twist bit, and a light grip. Mark the spot, start square, and let the bit cut. If you lean the drill, the hole wanders and the screw follows it. As the bit is about to break through the back of a cupboard side, ease off. A bit that punches through at full speed tears the exit face and can snatch. Metal wants a slower start and a drop of cutting fluid if you have it, still on the drill symbol, still not on hammer. A small hole in a thin bracket is often happier in gear 1 so the bit does not skate. Plastic melts if you stay on the trigger after the hole is made, so drill in short bursts and clear the swarf. A wood bit, an HSS bit or a flat bit in hammer mode chips the cutting edge. If you have just finished a masonry hole, look at the collar again before you pick up the timber bit. These rows are keyless. Centre forward/reverse, release the trigger, open the sleeve, seat the bit fully, and tighten until it does not slip when you twist it by hand. Do not tighten the chuck by pulsing the trigger with the sleeve in your fist.

Hammer mode, in one rule

Hammer mode is the hammer symbol, a masonry bit, and masonry. Gear 2 is the usual gear for that typical hammer drilling. The percussion in these tools is in a normal three-jaw chuck. It is not an SDS piston, and a blows-per-minute figure on one listing is not the figure for the others. Only the BLACK+DECKER bullets in this set state a rate, 21,000 BPM. Do not generalise that number. On brick, many people start on the drill symbol until the tip has bitten, then switch to hammer. If the bit stalls, smokes, or polishes a shiny spot and the hole does not deepen, stop. More trigger is the wrong response. That stall is the moment to read combi drill vs SDS drill, not the moment to lean your weight on the back of the drill. Hammer mode on timber, metal or plastic, or with a wood bit still in the chuck, is the other wrong turn. Release the trigger, wait until the chuck has stopped, and move the collar back to the drill symbol before you continue.

When to stop

Scan for cables and pipes before the bit touches the wall. A pipe detector is a few minutes. A nicked cable is not a clutch setting you can undo. If you cannot tell what is behind the plaster, or the fixing is heavy and you do not understand the wall, stop and get someone who does this for a living. The same stop applies to chasing and core drilling. Those are not combi jobs. If the bit binds in timber, release the trigger. Do not free a jammed bit by pulsing forward and reverse while you hold the body. Let it stop, then back it out. At work, PUWER 1998 applies to the equipment you provide, and masonry drilling sits inside dust, noise and vibration duties. A householder’s shelf is not that assessment. These listings state no decibel level and no vibration magnitude, so do not invent one for the drill in your hand. The Health and Safety Executive’s INDG175 illustration, which is not a test of these kits, is about 15 minutes of hammer use to the 2.5 m/s² A(8) action value and about an hour to the 5 m/s² limit. That is a reason to keep hammering short, not a timer you set for a brand. Noise action values of 80 and 85 dB(A), and a limit of 87 dB(A), are the regulations, not a reading from the box.

Common questions

What are the three modes on a combi drill?
The numbers are a slipping clutch for screws. The drill symbol locks the clutch out for a spinning hole in wood, metal or plastic. The hammer symbol adds percussion for a masonry bit in masonry. Gear 1 and gear 2 sit on a separate switch. Stop the chuck before you move any of them. A click while driving a screw is often the clutch working, not a broken gearbox.
Should screws be in gear 1 or gear 2?
Use gear 1 for screws. It is slower and less likely to cam out of the head. Gear 2 is for small drill bits and for typical hammer drilling, not for seating a hinge screw. If a long structural screw’s own instructions tell you to drive it in drill mode, follow the packet, and still start with a pilot hole. A higher clutch number is not a substitute for the right gear.
What clutch number should I start on?
Start lower than you think, on a scrap of the same material, and step up until the head sits flush and the clutch clicks. Collars in this set run from 10 settings to 25, so a number on one brand is not the torque of the same number on another. Do not convert clutch steps into newton metres. If the head strips, you were too high or you were on the drill symbol.
Can I drill a hole with the collar on a number?
You can, and the clutch will slip as soon as the bit bites, which burns time and can leave a half-finished hole. For wood, metal and plastic, use the drill symbol so the clutch is locked out. Reserve the numbers for screws. The hammer symbol is a third choice, not a more-power version of the drill symbol, and it does not belong on a wood bit.
Can I use hammer mode on wood or with a wood bit?
No. Hammer mode is for masonry, with a masonry bit. A wood bit, an HSS bit or a flat bit in hammer mode chips and overheats. Timber, metal and plastic stay on the drill symbol. If you have been drilling brick, stop the chuck and move the collar back before you change to a timber bit. The brick page covers the plug hole. This rule is only the mode.
When do I stop if the bit stalls?
Release the trigger as soon as the bit binds or the hole stops deepening. Do not pulse the trigger to force it, and do not lean harder on a masonry bit that has glazed. Back the bit out once it has stopped, clear the dust, and look at the material. A stall in ordinary timber is usually a blunt bit or a snatch as you break through. A stall in masonry is the point where a combi may be the wrong tool.
How do I change the bit without the chuck spinning?
Centre the forward/reverse switch so the trigger cannot run, wait until the chuck has stopped, then open the keyless sleeve. Seat the new bit fully and tighten by hand until it does not twist. These kits are keyless, so do not hunt for a chuck key. Do not hold the sleeve and tap the trigger to spin it tight. That is how a cuff or a finger meets the chuck.

Related pages

Sources

Public UK sources from the research digest for this comparison, retrieved 22 October 2026. Shelf prices, stars and review counts are the amazon.co.uk figures in the stored listings.

  1. HSE, vibration duties (retrieved 22 October 2026)
  2. HSE INDG175, hand-arm vibration (retrieved 22 October 2026)
  3. HSE CN3, silica from drilling masonry (retrieved 22 October 2026)
  4. Control of Noise at Work Regulations 2005, regulation 4 (retrieved 22 October 2026)
  5. GOV.UK, Supply of Machinery (Safety) Regulations 2008: Great Britain (retrieved 22 October 2026)
  6. BSI, BS EN 62841-2-1, hand-held drills and impact drills (retrieved 22 October 2026)
  7. GOV.UK, accepting returns and giving refunds (retrieved 22 October 2026)
  8. ToolStore UK, combi drill torque bands (retailer guide) (retrieved 22 October 2026)