Independent comparisons. We may earn from shop links. More info

How to fit coving: mitre, adhesive and a tape bead

Updated: 23 October 2026

You have a length of cove on the floor, or a roll of peel-and-stick bead, and you want it on the ceiling line today. How to fit coving splits into two jobs that do not share a glue. Rigid plaster, polystyrene, or polymer cove is pencil lines, a mitre, and the adhesive that material allows. A tape bead is a clean dry surface and a firm press. This page walks through both, and it says when to stop and call a plasterer. It does not rank the seven listings on the [Coving comparison](/hub/diy-supplies/coving). Products Compared did not fit a room for this guide. A qualifying amazon.co.uk purchase can earn a commission at no extra cost to you.

You have a length of cove on the floor, or a roll of peel-and-stick bead, and you want it on the ceiling line today. How to fit coving splits into two jobs that do not share a glue.

Our top picks

Conwang Conwang silicone U-trim

Best overall

Conwang Conwang silicone U-trim
7.6/10about £15.99
Lifuncren Lifuncren quadrant trim

Best value

Lifuncren Lifuncren quadrant trim
7.0/10about £16.99
On this page

Two jobs, two methods

Gyproc Cove 100 is a 3000 mm C in paper-faced gypsum. The amazon.co.uk trims are 9–42 mm flexible beads with tape on the back. Pinning a silicone strip, or smearing cove adhesive on a quadrant, mixes the jobs. Mark the maker's lines, not a generic width of the coving dropped from the ceiling. That width mark is the girth mistake. For Cove 100 the guide lines are 67 mm down the wall and 67 mm across the ceiling. Pencil both, and check for cables if you will nail. The material choice is on polystyrene or plaster coving.

Mark, cut, and stick rigid cove

Dust-sheet the floor, key painted plaster, and brush off the dust. Take wallpaper off the glue line. British Gypsum allows only a 2–3 mm paper overlap where the finish will cover it. Cut in a cove mitre block with a fine-tooth saw. Transfer the wall length to the back of the wall edge. An external mitre on Cove 100 needs an extra 67 mm for the ceiling projection. Internal corners use opposing 45° slots. External corners reverse that. Spread Gyproc Cove Adhesive about 3 mm thick on both contact faces and on the mitres. Two temporary nails support a length until the adhesive has set, then you remove them. They are not the permanent fix.
Conwang Conwang silicone U-trim

Testsieger

Conwang Conwang silicone U-trim
7.6/10about £15.99

Which adhesive for which cove

Gyproc Cove Adhesive: mix, rest about 10 minutes, and use it within about 40 minutes. A hard set is about 2 hours, and paint after about 24 hours. Do not use it on a frozen background or above 49°C. The sheet refuses repeated moisture. The steamy-room case is on bathroom coving. Polystyrene takes solvent-free adhesive and water-based paint. Wickes says no solvent adhesive, no solvent paint, and a 24-hour wait. Everbuild's grab names plaster and polystyrene and leaves out polyurethane and permanently damp rooms. ORAC asks for 5°C and rising, and the top edge of their coving on the bottom of the mitre box. One cartridge does not cover plaster, foam, and polyurethane.

Fitting a peel-and-stick bead

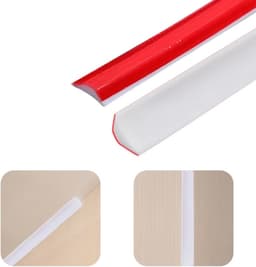
Put the mitre box away. The surface has to be clean, dry, and sound: no damp, dirt, flaking paint, or wallpaper under the strip. Measure, cut, peel, and press. A 45° snip can neaten a true 89°–90° corner. Use Conwang's promoter only because that pack includes it. A hairdryer for about 30 seconds is only on the Conwang and GDWD pages, and only when they say the glue is weak in the cold. Cut long and do not stretch the bead, or it creeps back. If the red backing pulls the adhesive off, pressing harder will not replace the glue.

When to stop

Rigid cove follows that maker's lines and adhesive. Tape is a clean, dry press, cut long and not stretched. A corner that is not close to 90°, or a crack that is still moving, is a plasterer.

Common questions

Where do I draw the lines for Gyproc Cove 100?
Draw 67 mm down the wall and 67 mm across the ceiling, which are the guide lines on the British Gypsum Cove 100 sheet. Those figures are for that profile. Cove 127 on an older sheet uses 83 mm lines, so do not copy 67 mm onto a different name. A how-to that says mark the width of the coving is marking the girth, not the drop.
Which way does the cove sit in the mitre box?
Follow the block you are using, and keep internal and external cuts on opposing 45° arrangements. British Gypsum tells you to transfer the wall length to the back of the wall edge, and to add 67 mm of length on Cove 100 for an external mitre's ceiling projection. ORAC asks for the top edge of their coving on the bottom of the box. If the two sheets disagree, the sheet for the product in your hand wins.
What adhesive for plaster, and what must I avoid on polystyrene?
Gyproc cove uses Gyproc Cove Adhesive, about 3 mm on both contact faces and on the mitres. Polystyrene needs solvent-free adhesive and water-based paint. Solvent glue and solvent paint can melt the foam. Everbuild's coving grab names plaster and polystyrene and explicitly leaves out polyurethane and permanently damp rooms. Do not use one tube for all three materials.
How long before I paint rigid cove?
On the Gyproc adhesive sheet, wait about 24 hours. A hard set is about 2 hours, which is not the same as ready for paint. Wickes' polystyrene instructions also say at least 24 hours before decoration, and they want emulsion or other water-based paint. Polymer ranges such as ORAC print their own 24-hour decorate wait. None of that is a paint instruction for the self-adhesive tapes, because those pages do not answer the paint question.
Do I pin the cove, and do I check for cables first?
Two temporary nails can support a Gyproc length until the adhesive sets, and you remove them afterwards. They are not the permanent fixing. Scan for cables and pipes before you nail. DIY Doctor flags that check, and it is easy to skip when the line looks clear. A peel-and-stick bead does not get nails at all.
How do I fit a peel-and-stick bead without a mitre box?
Clean and dry a sound, smooth surface, cut the strip, peel the backing, and press both edges. Do not stretch it. Use a promoter only if that pack includes one, as Conwang does. Use a hairdryer only if that listing says the adhesive is weak in the cold, about 30 seconds on the Conwang and GDWD wording. If the corner is not close to 90°, stop. A 45° cut will gap, and a plasterer is the safer call on a bay or a moving crack.

Related pages

Sources

Public UK sources and the amazon.co.uk listings compared on this page. Updated 22.10.2026.

  1. British Gypsum: Gyproc Cove 100 data sheet (retrieved 22.10.2026)
  2. British Gypsum: Gyproc Cove Adhesive data sheet (retrieved 22.10.2026)
  3. British Gypsum: Cove Adhesive installation guidance (retrieved 22.10.2026)
  4. Approved Document B volume 1, 2019, dwellings (retrieved 22.10.2026)
  5. Toolstation: How to fit coving (retrieved 22.10.2026)
  6. Wickes: How to put up coving (retrieved 22.10.2026)
  7. Wickes: Arthouse polystyrene coving 100 mm × 2 m (retrieved 22.10.2026)
  8. DIY Doctor: Coving (retrieved 22.10.2026)
  9. The Coving & Cornice Warehouse: Choosing your material (retrieved 22.10.2026)