Independent comparisons. We may earn from shop links. More info

How to use a welding helmet safely

Updated: 18 October 2026

You have fitted a fresh cover lens, the welder is ready and the joint is tacked, but the first arc is not the moment to discover that the helmet is still in grind mode. Learning how to use a welding helmet means the same order every time: fit it, select weld mode, set shade, sensitivity and delay, then test the filter before exposing your eyes to an arc. Our [welding helmet comparison](/hub/soldering-and-welding/welding-helmet) shows how controls differ between models. Your own manual remains the authority for its marked shade range, test method and operating limits.

You have fitted a fresh cover lens, the welder is ready and the joint is tacked, but the first arc is not the moment to discover that the helmet is still in grind mode.

Our top picks

YESWELDER YESWELDER LYG-L600A

Best overall

YESWELDER YESWELDER LYG-L600A
8.6/10about £37.04
TOOLIOM TOOLIOM TL-31800H

Rank 2

TOOLIOM TOOLIOM TL-31800H
9.0/10about £54.14
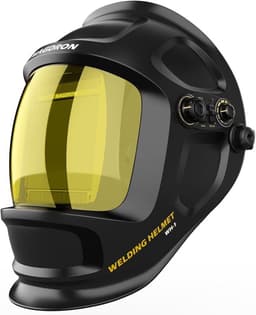
Magdron Magdron WH-1

Alternative

Magdron Magdron WH-1
8.5/10about £79.98
On this page

Fit the headgear so a nod keeps the helmet down

Inspect the helmet before you put it on. The shell should not be cracked, the auto-darkening cartridge should be secure, and both cover lenses should be clean and undamaged. Do not operate without the specified covers: spatter and scratches can damage the filter or obscure the sensors. Check the battery indicator or test function, and confirm that any replaceable cell matches the type and orientation in the instructions. Set the rear ratchet so the headband is firm without a pressure point. Adjust the top straps for height, then the side or fore-and-aft adjustment so your eyes look through the useful part of the window and the shell does not touch your nose. With the side pivots tensioned, raise the helmet and nod it down. It should descend smoothly and stay in the working position. UK reviews in this comparison describe broken ratchets, helmets that will not stay raised and one that fell on the user during a weld. If the headgear slips or a part is cracked, replace it before welding. Do not overtighten a damaged mechanism until it hurts.

Set mode, shade, sensitivity and delay

Find the mode control first. It may be an external weld, cut and grind switch, an internal selector or a digital button. Select weld mode and verify the indicator where one is provided. Grind mode keeps the filter light and must not be used for welding. Do not infer a setting from another brand’s layout. Choose a dark shade within the range printed on your filter. Many helmets in this set provide DIN 9–13 for ordinary MIG and stick. Shade 10 or 11 is a reasonable rule-of-thumb starting area, not a universal prescription. A separate 5–9 band can suit lower-intensity work. Never go below the marked range because the puddle looks dim. The welding helmet buying guide explains why a low shade band is not itself proof of low-current TIG detection.
YESWELDER YESWELDER LYG-L600A

Testsieger

YESWELDER YESWELDER LYG-L600A
8.6/10about £37.04

Test the filter, then stop if it fails

Sensitivity controls how readily the filter responds to light from the arc. Increase it for a small arc. Reduce it if strong work lamps or a neighbouring welder darken the lens before you begin. Delay controls how long the filter remains dark after the arc stops. A longer delay can be more comfortable after a bright, high-current weld. A shorter delay suits a series of tacks. These are adjustments inside the manual’s range, not a rescue for a filter that repeatedly fails. Clean the sensors, and keep the torch, your hand and a high collar from blocking them. Four sensors provide more angles than two, and they still need a line towards the arc. If low-current TIG is the task, use the welding helmet for TIG guide.

Screens, chipping and fume

Use the pre-use test specified by the manufacturer. UK Sealey instructions describe facing a bright light and covering and uncovering the sensor so you can see the filter change state. Some helmets provide a test button instead. Do not stare at the sun. Repeat the test after a battery change, a moved control, a new cover lens or a long period unused. Before the real arc, confirm the shell, lenses, battery, clean sensors, weld mode and shade, and screen people nearby. If the filter does not darken when the arc starts, stop and close the arc. Recheck away from exposure, then repeat only the approved non-arc test. Flicker during welding also means stop. If it still cuts between light and dark, replace the helmet or have it assessed. Arc-eye pain can develop hours later. The helmet is one part of the work area. Keep other people behind suitable welding screens, and follow HSE controls for fume. A standard shell is not respiratory protection. When chipping slag or wire-brushing with the dark filter raised, wear clear eye protection.

Common questions

What is sensitivity for?
Sensitivity determines how readily the auto-darkening filter responds to incident light. A small or low-current arc may require a higher setting, while a strong work lamp may require less to prevent premature darkening. It cannot compensate for a blocked sensor, wrong mode or an arc below the helmet’s published capability.
What is delay for?
Delay determines how long the lens remains dark after the arc stops. A longer delay can reduce discomfort from a hot, bright puddle after higher-current work; a shorter delay helps when making repeated tacks. Use the manual’s range and do not treat delay as a cure for flashing during the arc.
Can I weld in grind mode?
No. Grind mode is designed to hold the filter in a light state so you can see while grinding. Return the helmet to weld mode and verify the setting before every arc. If the selector is damaged or its position is uncertain, do not weld until the fault is corrected.
How can I test an auto-darkening helmet?
Follow its instructions. Some UK manuals specify facing a bright lamp and alternately covering and uncovering the sensors; other models have a test button. Check that the filter changes state, but do not stare at the sun or use repeated welding arcs as a diagnostic test.
What should I check if the lens stays light?
Stop the arc, then check grind mode, battery state, clean cover lenses, unobstructed sensors, sensitivity and the filter’s operating limits. Repeat the approved non-arc test. If it still fails to darken, replace or professionally assess the helmet instead of trying one more arc.

Related pages

Sources

Public UK sources and the amazon.co.uk listings in this set, checked on 16 October 2026.

  1. HSE, welding and flamecutting (retrieved 16 October 2026)
  2. HSE, health risks from welding (retrieved 16 October 2026)
  3. HSE, avoid and reduce welding fume (retrieved 16 October 2026)
  4. HSE WL3, welding fume (retrieved 16 October 2026)
  5. BS EN 379:2003+A1:2009, automatic welding filters (retrieved 16 October 2026)
  6. BS EN 175:1997, welding shields (retrieved 16 October 2026)
  7. GOV.UK, PPE enforcement in Great Britain (retrieved 16 October 2026)
  8. 3M UK, welding eye and face protection (retrieved 16 October 2026)