Independent comparisons. We may earn from shop links. More info

How to install a wireless doorbell safely

Updated: 16 October 2026

When you install a wireless doorbell, fixing the button before checking the chime in the kitchen or upstairs is a costly mistake. Set up the power, test with the front door closed, and only then use tape or screws. The kits in our [wireless doorbell comparison](/hub/grills-and-barbecues/wireless-doorbell-stainless-steel) avoid new fixed wiring: receivers plug into UK sockets or use batteries, while buttons use a cell or generate energy when pressed. This sequence does not cover a consumer unit or a mains bell transformer. The Products Compared editorial team used the amazon.co.uk listings. A qualifying purchase can earn a commission at no extra cost to you.

When you install a wireless doorbell, fixing the button before checking the chime in the kitchen or upstairs is a costly mistake. Set up the power, test with the front door closed, and only then use tape or screws.

Our top picks

On this page

Plug in the chime before you drill

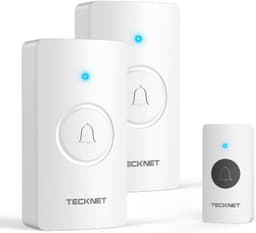
A plug-in chime should have a UK BS 1363 plug for a 230 V socket. Do not leave a travel adaptor as the permanent setup. If the kit has two receivers, power them in the rooms where you expect to hear them, not side by side. For a battery chime, fit the cells as the manual shows. The TECKNET HWD01990 listing says three AA cells are required and also says batteries are not required. A UK reviewer describes three AA cells in each sounder. Have cells for both receivers and treat the supplied instructions as the deciding source. A no-battery headline on a kinetic model normally applies to the outdoor push, not the plug-in chime. Remove any insulating tab, pair the kit, and choose a short tone. Press the button with the exterior door closed, and check every receiver. Claims of 300 m or 400 m do not reproduce brick or metal. If reception drops, move the receiver before you drill.

Fix the button with tape or screws

Clean and dry the surface after the range test. Tape is quick on a smooth, sheltered frame and less dependable on damp timber, uneven masonry, dusty paint or an exposed gate. Press it for the time in the instructions, and check the bond after the first cold or wet spell. Screws are the better long-term choice on an exposed surface. AVANTEK lists tape, screws and anchors. The SURFOU boxes list tape, dowels and a screwdriver. Use the backplate as the template. Before drilling, check for concealed cables and pipes. Leave room to open the battery cover. UK guidance commonly suggests around 1.2–1.4 m. Test a metal frame again, then check an unsheltered spot against the outdoor weather guide.

Set up sockets, pass-through power and alerts

Put the receiver where you can hear it and see the LED. In a two-chime kit, separate the units by floor. Use different tones only when two buttons need to be told apart. The LED or silent mode helps when a constant ring is unwelcome. Pass-through receivers such as the TECKNET HDB01806 and HWD01816 let another plug use the outlet. That is not permission for any load. A 2,000 W figure appears in a review of the HWD01816 and on a related TECKNET page, but it is not in this ASIN’s extracted bullets. Read the supplied manual before you connect a kettle or heater. If no suitable socket exists, do not run an extension through a doorway. A battery-chime kit may fit better. The plug-in versus battery guide sets out that trade-off.

When this stops being a plug-in job

Stop if the work exposes unknown fixed cable, means opening a consumer unit, or involves a hot or unidentified transformer. A complete wireless kit should not need you to alter household mains wiring. If you cannot identify an old bell circuit, use a qualified electrician. Unplug a receiver that arcs, smells burnt, discolours a socket or trips protection, and contact the seller. Moving it is not a diagnosis. Cells, pairing, tape, screws and a sound socket do not require electrical alterations. Test once more from outside with the door closed. Note the button-cell type or the date you fitted AA cells. Under the Consumer Rights Act 2015 you can reject faulty or misdescribed goods within 30 days.

Common questions

Should I drill before testing the range?
No. Power and pair the kit, close the exterior door, and test every intended receiver location first. Walls, metal and appliances can reduce an open-area range claim. Moving a receiver or the button by a small distance is easier before you have drilled the frame. A 300 m or 400 m line is not the distance through the house.
Is adhesive tape or screws better?
Tape suits a smooth, dry and sheltered frame when the manufacturer supplies it. Screws are more dependable on uneven, damp or exposed surfaces, provided the fixing is suitable and no cable or sealed door unit is at risk. Range-test the exact position before using either method. Check the tape again after the first cold or wet spell.
Where should I plug in the chime?
Use a sound UK socket where you can hear the receiver and see its LED. Keep it indoors and clear of splashes and furniture. For two receivers, place them in separated occupied areas rather than next to each other, then check both from the outdoor push. A plug-in chime needs a BS 1363 plug for 230 V.
What is the battery tab?
It is a small insulating strip that prevents a pre-fitted button cell from discharging in storage. Pull it out before pairing or testing. If the button does not work afterwards, confirm the cell orientation and type from the unit and manual rather than relying solely on the online listing. A tab left in place keeps the button silent.
Can I use a kettle in a pass-through chime?
Only if the actual receiver manual permits that load. Do not assume every pass-through model has the same limit. The extracted HWD01816 bullets do not state a wattage, so verify the supplied instructions before connecting a kettle, heater or another high-power appliance. Stop if the plug or socket becomes hot.
When should I call an electrician?
Use an electrician when installation requires altering fixed mains wiring, opening a consumer unit, tracing an unknown bell transformer or dealing with damaged cable. A plug-in wireless kit should not need those tasks. Unplug any receiver that becomes hot, scorched or electrically unstable, and contact the seller rather than moving it and hoping.

Related pages

Sources

Listing prices, stars and review counts are from the amazon.co.uk pages used for this comparison on 16 October 2026. The public sources below cover plugs, radio equipment, IP codes and consumer rights. This is not a lab test.

  1. Ofcom: radio spectrum and the law (retrieved 16 October 2026)
  2. GOV.UK: Radio Equipment Regulations 2017, Great Britain (retrieved 16 October 2026)
  3. Electrical Equipment (Safety) Regulations 2016, regulation 35 (retrieved 16 October 2026)
  4. GOV.UK: Electrical Equipment (Safety) Regulations 2016, Great Britain (retrieved 16 October 2026)
  5. RNID: doorbells (retrieved 16 October 2026)
  6. Consumer Rights Act 2015 (retrieved 16 October 2026)
  7. ManoMano UK: doorbell and intercom buying guide (retrieved 16 October 2026)
  8. IEC 60529 IP rating chart (buyer summary) (retrieved 16 October 2026)