Independent comparisons. We may earn from shop links. More info

Clamps for wood glue: pressure, cauls and timing

Updated: 17 October 2026

Clamps for wood glue should close the joint and keep the faces aligned, not force a badly fitted seam together at any cost. For a PVA glue-up, look for a thin, even line of squeeze-out and a flat assembly rather than the largest kilogram printed on an amazon.co.uk listing. None of the clamps in this comparison was glue-tested, and the timing below comes from published adhesive guidance rather than these products. Use the [main clamps comparison](/hub/tools/clamps) to check jaw, throat and saved GBP prices once you have planned where the pressure must land. A qualifying purchase can earn a commission at no extra cost to you.

Clamps for wood glue should close the joint and keep the faces aligned, not force a badly fitted seam together at any cost.

Our top picks

IRWIN Irwin Quick-Grip 300 mm pair

Best overall

IRWIN Irwin Quick-Grip 300 mm pair
9.4/10about £14.90
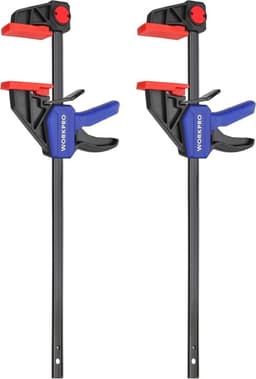
WORKPRO WORKPRO 150 mm pair

Best value

WORKPRO WORKPRO 150 mm pair
9.2/10about £12.99
WORKPRO WORKPRO 305 mm pair

Rank 3

WORKPRO WORKPRO 305 mm pair
9.2/10about £16.99
On this page

Enough pressure produces an even glue line

Dry-fit the parts before opening the glue. The joint should close with hand pressure or modest clamping, without a large gap that requires the timber to bend. Check that each clamp spans the work with spare jaw travel and that its throat reaches the intended pressure point. Arrange clamps, protective scrap and any cauls before the adhesive clock starts. Apply PVA according to its instructions and bring the mating faces together. Tighten the clamps in small alternating steps until the joint closes and a thin, reasonably even line of glue appears. Mark Haley’s UK workshop guidance warns that excessive force can bow thin work and squeeze too much adhesive from the seam. More trigger pulls do not automatically create a stronger joint. Dry sections can mean too little glue, poor fit or badly placed pressure. A board that arches or throws most adhesive out may be over-clamped. Correct the setup while the glue remains workable. A printed 63 kg or 68 kg is a catalogue maximum, not a target. Clean, flat scrap under the pads reduces marking and spreads contact. Reviews mention loose pads on WORKPRO, LOLYSIC and the small G-clamps, so inspect them first. The guide to using a bar clamp covers missing pads and safe release. Lee Valley advises against smearing wet glue over the wood because residue can affect finishing. Remove it at the specified stage or let the bead become rubbery, without disturbing the aligned joint.

Use cauls to keep faces in plane

A caul is a straight batten or shaped block placed across the work to distribute pressure and keep surfaces aligned. Put protective material between the caul and glue where needed, then clamp the caul and assembly so pressure reaches more than one narrow pad location. On a small panel, a caul can stop the centre lifting while clamps pull at the edges. It does not increase the jaw capacity of the clamp holding it. Woodworkers Institute describes spacing around 200–255 mm as one maker’s rule of thumb, not a requirement for these listings. A thin panel may need closer, gentler contact. Watch the seam and flatness instead of applying a universal interval. Alternate clamp positions where possible because every bar beneath one face can encourage bowing. Tighten each a little at a time and sight along the surface. If a caul bends or the work lifts, stop and rebalance pressure. The longest stated jaw is 305 mm on WORKPRO. Irwin is described as 150–300 mm. That may cover a small box or narrow board, but not a broad tabletop or door. Throat depth also limits placement. Irwin states 62 mm and the WORKPRO long and short pairs state 60 mm. If the seam lies farther from an edge, neither pad reaches it directly, regardless of the bar opening. A caul can distribute pressure from accessible edges, but it cannot rescue a setup that remains unstable or leaves the joint visibly open.

Choose bars for the seam and springs for small support

For a board near 150–300 mm, the Irwin pair and WORKPRO 305 mm pair have relevant jaw specifications. Irwin states up to 63 kg and a 62 mm throat. WORKPRO states 68 kg, a 60 mm throat and a 305 mm jaw. Those claims help distinguish the products, but neither pair was tested on a common glue joint. Both are light one-handed bars rather than heavy panel clamps. The WORKPRO 150 mm pair states a 60 mm throat, but its force text conflicts between 68 kg, 150 lb and 50 lb. Amazon Basics offers several short trigger-bar contact points with stated forces of 9.98 kg and 45.36 kg, although its title incorrectly says spring. LJHOME’s four 4-inch bars may be enough for model work or a tiny craft joint. Reviews already restrict them to light holds, and no force or throat is stated. That absence keeps the set out of a specification-led recommendation for a valuable joint. The best bar clamps UK page gives conditional picks without claiming laboratory results. A spring clamp can hold a small trim, model part or caul temporarily, but it should not be the only primary clamp for a wide panel. EMART’s backdrop clips state 10 lb and a 2-inch opening. LOLYSIC and swihorab state no holding force, while reviews describe LOLYSIC springs as hard to open. Fixed spring pressure cannot be increased at a dry spot or eased at a surface that begins to dent. Spreader mode is irrelevant to closing a conventional glue line. For the mechanism choice, read spring clamp or bar clamp.

Keep it clamped for the adhesive, then let it cure

Lee Valley’s en-GB PVA guidance gives a broad clamping period of about 30–90 minutes, depending on temperature, humidity and the particular glue. It also notes that full strength is often associated with around 24 hours. Those figures are guidance, not evidence that every bottle in a UK workshop follows the same schedule. Read the label or technical sheet for the adhesive you actually use. Cold and damp conditions can extend clamp time. Do not stress the joint simply because clamps are off. Handling strength and full cure differ. The adhesive’s longer minimum takes priority. Before release, support the assembly and ease clamps gradually. Remove cauls without levering against a soft edge, then leave the work undisturbed. Clean and dry steel bars because reviews mention corrosion after damp or coastal storage. Stop and seek experienced joinery advice when the work is structural, unusually valuable, heavily loaded or too large for stable support. A long door, staircase component or structural timber joint is outside this short light-duty set. Glue cannot compensate for poor joinery, and a consumer trigger clamp is not engineering evidence for a load-bearing assembly.

Common questions

How tight should clamps be on PVA?
Tighten until the joint closes and shows a thin, even line of squeeze-out while the work stays flat. Do not aim automatically for the clamp’s maximum stated force. If the board bows or most glue is expelled, release and correct the setup. A gap that remains may indicate poor fit rather than a need for more pressure.
How long should PVA remain clamped?
Lee Valley gives roughly 30–90 minutes depending on temperature, humidity and glue, with full strength often around 24 hours. Treat that as broad guidance. The bottle or technical sheet for your adhesive governs the actual joint. Cold or damp UK conditions can lengthen the process, and unclamped does not mean ready for full load.
What is a caul?
A caul is a straight or shaped piece placed across the work to spread pressure and keep faces aligned. Clean scrap can serve on a small job if it is flat and protected from the glue. Clamp placement still matters: a flexible caul or pressure at only one point can leave the seam open elsewhere.
Are spring clamps enough for wood glue?
They may be enough for a tiny model part or light trim where the joint closes easily. They are not the preferred sole clamps for a broad panel or important seam because their pressure is fixed and often unstated. Use adjustable bars or a heavier suitable clamp type when even distributed pressure matters.
Which clamps here reach around 300 mm?
The Irwin pair is described with a 150–300 mm jaw and 62 mm throat, while the WORKPRO long pair states a 305 mm jaw and 60 mm throat. Their force figures are listing claims, not glue-test results. Confirm that the throat reaches your seam and allow space for protective scrap or a caul.
When is this comparison the wrong place to choose?
Move beyond it for a wide tabletop, long door, structural timber, a load-bearing joint or any setup that cannot be safely supported. The bars here stop around 305 mm and are described as light-duty products. Choose a clamp class and adhesive system suited to the engineering of the work, or ask an experienced joiner.

Related pages

Sources

Public UK sources for satisfactory quality, workplace equipment, and woodworking-machine standards. Clamp sizes and forces are the amazon.co.uk captures for these eleven ASINs on 16 October 2026, plus the Irwin page for T54122EL7. Prices on amazon.co.uk move.

  1. Consumer Rights Act 2015, section 9 (retrieved 16 October 2026)
  2. HSE, PUWER overview (retrieved 16 October 2026)
  3. HSE, woodworking standards (retrieved 16 October 2026)
  4. IRWIN, mini one-handed bar clamp (retrieved 16 October 2026)
  5. Thomas Graham, clamp size and force (retrieved 16 October 2026)
  6. Lee Valley, working with PVA glues (retrieved 16 October 2026)
  7. Mark Haley, glue-ups with clamps and cauls (retrieved 16 October 2026)
  8. amazon.co.uk listings, 16 October 2026 (retrieved 16 October 2026)