Independent comparisons. We may earn from shop links. More info

How to use Wago connectors safely and correctly

Updated: 17 October 2026

You have removed a ceiling fitting and found cramped conductors under small screws. Before replacing anything with a lever connector, you need to know which conductors belong together, make the circuit dead and follow the strip length for the exact product. This guide explains how to use Wago connectors as a handling sequence, not as permission to alter wiring you do not understand. If you have not chosen the model yet, compare the products on our [Wago connectors comparison](/hub/tool-accessories/wago-connectors). Once the correct connector is in hand, the sequence is isolate, strip, open, insert, close, tug and enclose. A qualifying purchase can earn a commission at no extra cost to you.

You have removed a ceiling fitting and found cramped conductors under small screws.

Our top picks

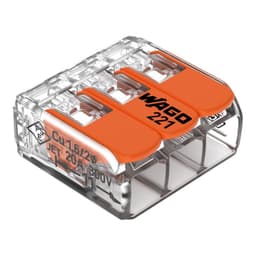
Wago Wago 221-413, pack of 50

Best overall

Wago Wago 221-413, pack of 50
9.2/10about £12.59
Wago Wago 221-413, pack of 10

Best value

Wago Wago 221-413, pack of 10
8.2/10about £5.35
On this page

Make the circuit dead before touching conductors

Switching a wall switch off is not sufficient isolation. A ceiling point can contain permanent live conductors even when the lamp is dark, and a borrowed neutral or unexpected circuit arrangement can defeat assumptions. Isolate the appropriate circuit at the consumer unit and use suitable equipment and a safe proving procedure to confirm that it is dead. If you do not know how to do that, stop and use a competent electrician. The small test opening on a connector does not authorise live work. Some captured listings limit use to qualified personnel.

Strip, open, insert and close

For a genuine compact Wago 221 in the 4 mm² family, the documented strip length is 11 mm. Use the gauge moulded or printed on the body where available and measure the exposed copper, not the whole end of the cable. Several compatible connectors in this comparison state 9–10 mm, and the Flintronic listing says 10 mm. Follow the instructions for the exact brand and model; do not automatically transfer the genuine Wago figure to a copy. Lift the lever fully, normally to about 90 degrees, without forcing it beyond its stop. Insert one correctly stripped copper conductor into the port until it reaches the internal stop. On a clear body, look for full insertion and check that no bare copper remains exposed outside the housing. Then lower the lever completely. Do not tin strands with solder before clamping them, and never reduce a conductor by cutting strands to fit. If the connector refuses to accept the conductor, pause rather than using extra force. Our Wago connectors buying guide explains ordinary 4 mm² bodies, mixed port counts and the inline form.
Wago Wago 221-413, pack of 50

Testsieger

Wago Wago 221-413, pack of 50
9.2/10about £12.59

Put one conductor in each port

A screw terminal may have held two conductors beneath one screw, but that physical arrangement does not transfer to a lever connector. Wago’s handling sequence shows one conductor inserted into each opening. If three conductors need to be common, use a three-port 221-413; if five do, use a five-port 221-415. Do not push two 1.0 mm² conductors into one port merely because their combined bulk appears to fit. Port count is not the same as cable count. One twin-and-earth cable contains insulated conductors plus a protective conductor, and each circuit function must remain correctly grouped. If the chosen body has too few ports, replace it with the correct model rather than improvising a double entry.

Tug, enclose and know when to stop

After closing every lever, hold the connector and give each conductor a firm individual tug. The aim is to catch incomplete insertion or a lever that has not clamped, not to apply destructive force. If a conductor moves, open that port, remove it and inspect both the copper and connector. Do not rely on the enclosure lid to hold a loose wire in place. A cramped box is not improved by forcing the lid down. The connection is not finished until it is inside a suitable enclosure. A reachable box and an inaccessible maintenance-free accessory are different installation paths. A loose 221 is not itself the complete maintenance-free assembly, and a compatible copy cannot be substituted into a box whose instructions name particular Wago models. Read the Wago connector junction box guide before closing a ceiling or floor.

Common questions

How far should I strip a genuine Wago 221?
For the genuine compact 4 mm² 221 family discussed here, Wago documentation states 11 mm. Use the gauge on the connector and the instructions for the exact model. Do not assume 11 mm applies to every lever connector: several compatible listings in this comparison specify 9–10 mm instead.
What if my Amazon connector says 9–10 mm?
Follow reliable instructions for that exact brand and model, not the strip length of a visually similar Wago. Check that the conductor reaches the internal stop and that bare copper is not visible outside the housing. If the listing and product markings conflict, do not guess; obtain dependable documentation or use a better-specified connector.
Can two conductors share one Wago port?
No. The handling instructions show one conductor per port. Use a body with enough separate openings for every conductor that must be common, such as a three-port 221-413 or five-port 221-415. Two wires forced into one opening may not both be correctly gripped.
Do I need ferrules on flexible wire?
The genuine 221-413 documentation says ferrules are not required for the conductor types it lists. That statement does not automatically cover every cable, connector copy or installation. Keep strands intact, follow the exact product data and never add solder as a substitute for the correct termination.
How do I know the connector has gripped?
Close the lever fully, inspect conductor position through the housing where possible, check that no copper is exposed and tug each conductor separately. Any movement requires removal and inspection. A high Amazon rating or a lid pressing on the connector is not evidence of a secure termination.
When should I call an electrician?
Stop when you cannot identify the conductors, cannot prove the circuit dead, find damaged insulation or overheated copper, or need to alter circuit design. Also seek competent advice for inaccessible joints, special locations, consumer-unit work and new circuits. A simple lever mechanism does not simplify those wider risks.

Related pages

Sources

Public UK sources for conductor range, connection access, and notifiable work in England. Listings are the amazon.co.uk captures for these twelve ASINs, not a live reload on 16 October 2026. Prices on amazon.co.uk move.

  1. Wago GB, 221 splicing connectors (retrieved 16 October 2026)
  2. Wago 221-413 (retrieved 16 October 2026)
  3. Electrical Safety First, wiring regulations help (retrieved 16 October 2026)
  4. IET Wiring Matters, accessibility of connections (retrieved 16 October 2026)
  5. Building Regulations 2010, regulation 12 (retrieved 16 October 2026)
  6. Approved Document P (retrieved 16 October 2026)
  7. GOV.UK, building work, replacements and repairs (retrieved 16 October 2026)
  8. Hager Ashley, junction box guide (retrieved 16 October 2026)