Independent comparisons. We may earn from shop links. More info

How to install a channel drain

Updated: 22 October 2026

A channel drain only works if water can leave it. Before you open a bag of ballast, decide where the run ends and which outlet face you will use. This is how to install a channel drain for a UK DIY trench: plan the fall, dig and bed, connect the pipe, then pour and cure. This page is from Peter F., editor for DIY & tools. We used FloPlast, JDP and Drainage Central guidance plus the amazon.co.uk kits on 21 October 2026. We did not pour a trial trench. A purchase from the [drainage channel comparison](/hub/garden-watering/drainage-channel) can earn us a commission at no extra cost to you.

A channel drain only works if water can leave it. Before you open a bag of ballast, decide where the run ends and which outlet face you will use.

Our top picks

On this page

Plan the outlet and fall before you dig

Start at the discharge point and work backwards. JDP’s install notes treat bottom and end outlets as the usual ways into a pipe. Many domestic surface-water connections use about 110 mm pipe. Kits in this set sometimes print smaller knock-outs or 2 inch and 3 inch bottom outlets, so buy adaptors before the concrete goes off. Leave end caps on the high end and open the outlet only where the pipe starts. Aim for a fall of about 5 mm per metre toward that outlet, roughly 1:200. If the paving slopes the wrong way, the channel still needs its own fall. Set the grate about 2–3 mm below the finished surface. On a drive, confirm at least B125 before you cut tarmac. A15 under cars is a class error, set out on A15 vs B125 drainage. Class choice is on the drainage channel buying guide.

Dig, bed, and set levels

Excavate a trench wide and deep enough for a concrete bed and side haunch. FloPlast-style guides use about 50 mm of concrete under the channel and about 100 mm at the sides as a working rule, not a single depth for every profile. A shallow 10 cm body needs less dig than a 14 cm deep profile. Measure the channel, then add bed and haunch. Lay a wet concrete base, set the first section at the outlet end, and check fall as you go. Vodaland sections clip. Several Natotela reviews say joints do not give a hard click and must be aligned by hand. Do not dry-bed a vehicle-class channel in soil alone. A concrete surround is what lets the stated class mean anything once a wheel arrives. Where to put that line is on driveway drainage channel.
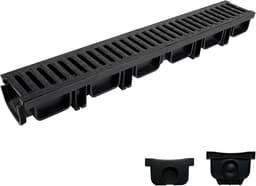
Vodaland Vodaland EASY 2, 5 pack

Testsieger

Vodaland Vodaland EASY 2, 5 pack
8.5/10about £49.99

Connect a bottom or end outlet to pipe

Fit the outlet before you bury the joint. End outlets suit a pipe at the low end. Bottom outlets suit a drop under the channel. Knock out only the opening you will use, blank the rest, and join with the adaptor the diameter needs. If a review calls the outlet an odd size, as on the HDPE Natotela pack, dry-fit the pipe before you mix a full batch. Support the pipe so it cannot pull the channel out of level. A removable grate is enough on a short patio run. Longer runs may need a sump so leaves do not turn the channel into a sealed tank. Hose the dry fit before the final pour. Water should reach the outlet without ponding mid-run. If it sits, reset the fall now.

Concrete, protect the grate, cure, reinstate

Haunch both sides so loads transfer into the concrete, not into thin plastic lips. Keep concrete off the grate slots. Tape or cover the grate before pouring so slurry does not lock the bars, then lift it and clean. Wear gloves with cast-iron grates. Reviews in this set report heavy sections that are awkward to reseat. Cure time depends on the bag and the channel sheet. Some DIY notes mention walking after about a day and vehicles later. Others point at roughly 72 hours before full load. Do not treat one number as universal. Reinstate paving with the grate still 2–3 mm low. On existing tarmac, cut clean edges, install, then reinstate. Once cured, flush the run so installation grit is not the first blockage.

Common questions

How deep should the trench be?
Deep enough for the channel height plus about 50 mm of concrete under it and room for a side haunch, often around 100 mm each side. Measure your profile. Shallow and deep bodies are not the same dig.
Do I need a fall in the channel?
Yes. About 5 mm per metre toward the outlet is a practical DIY target, roughly 1:200, so water does not sit in the modules. The channel still needs that fall if the paving slopes the wrong way.
Bottom outlet or end outlet?
Use whichever matches your pipe route. End outlets suit a pipe at the low end. Bottom outlets suit a drop under the channel. Blank every opening you do not use.
Can I install without concrete?
Not for a load-bearing driveway channel. Patio A15 kits still recommend a concrete surround on several listings. Soil alone will not deliver the stated class. Haunch both sides so the wheel load reaches the concrete.
How long before I drive on it?
Follow the concrete and channel maker’s cure window. Figures in DIY sheets vary from about a day for light access to roughly 72 hours for vehicles. Do not treat one number as a rule for every bag and every site.
How do I test before the concrete sets?
Dry-fit the outlet, hose the run, and watch for ponding. Fix the fall and the joints before the concrete sets. A cut in tarmac does not upgrade an A15 kit to B125.

Related pages

Sources

Public UK and manufacturer sources used for load class, installation and front-garden planning. Listing prices, stars and review counts are the amazon.co.uk lines saved on 21 October 2026. This is not a lab test.

  1. Drainage Superstore — how to select a channel drain (retrieved 21.10.2026)
  2. ACO — load classes to BS EN 1433 (retrieved 21.10.2026)
  3. ACO — RainDrain B125 (retrieved 21.10.2026)
  4. Clark Drain — the A15 debate (retrieved 21.10.2026)
  5. JDP — installing channel drain (retrieved 21.10.2026)
  6. FloPlast — channel installation notes (retrieved 21.10.2026)
  7. GOV.UK — permeable surfacing of front gardens (retrieved 21.10.2026)
  8. GOV.UK — Approved Document H (retrieved 21.10.2026)