Independent comparisons. We may earn from shop links. More info

How to set up a wireless burglar alarm

Updated: 20.10.2026

You have a self-install kit on the kitchen table, and the risk is sticking it to the wall before it has armed once. How to set up a wireless burglar alarm comes down to a code you have changed, a keypad you can reach, sensors that see the right thing, and a delay long enough for your walk. The [burglar alarm systems comparison](/hub/burglar-protection/burglar-alarm-systems) is where the twelve amazon.co.uk kits are ranked. This page is the fitting sequence, not another shortlist. Peter F. drew the times from the listings and the makers' UK support pages. There was no lab test.

You have a self-install kit on the kitchen table, and the risk is sticking it to the wall before it has armed once.

Our top picks

On this page

Before you stick anything

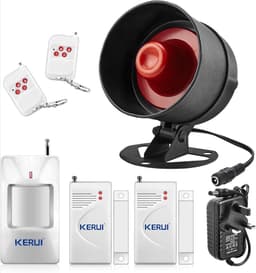
Create the account, if the kit has one, while the panel is still on the table. Change the default code before the keypad goes up. A code that is still 1234, or a panel that disarms with no code, is a weak lock once someone is inside. Pull any isolation tab. A KERUI contact with the tab left in stays silent. UK mains are 230 V with a BS 1363 plug. KERUI reviewers still put the siren on a short mains lead, so plan that socket first. X-Sense bases are corded, with no battery backup in the notes, so a power cut drops the Wi-Fi alerts. A new fused spur is notifiable electrical work. Do not add one to suit a short lead.

Panel, keypad, and contacts

Put the keypad by the door you actually use, on the inside, where you can reach it without crossing an instant zone. A rule of thumb puts the panel on an internal wall, so the radio can reach the furthest contact. That is not a certificate. Fit the contact and the magnet with the marks lined up. The TOWODE bullets say the gap should be under 10 mm. A wider gap reads as open. If the panel still says open, move the magnet before you use screws. On a rented flat, ask before you drill.

PIRs and delays

A passive infrared sensor belongs in a corner, looking across the room rather than at the window. Aiming it at glass, a radiator, or a sunny patch is how you get a false alarm on a warm afternoon. Follow the sheet in the box and walk-test. These listings do not share one mounting height. Set the delay on the door you use, and leave the other doors instant. Yale HSA states 20 seconds. SimpliSafe's UK default exit delay is 60 seconds. Ring allows 0 to 180 seconds if the contact is set as Main Door. The buying guide explains why a PIR and a contact are not substitutes.

When to stop

Stop if the next step is new cable from the consumer unit. That is an electrician's job. Stop if the insurer has named NSI, SSAIB, or a grade. Fitting a self-install box neatly is not a certificate, which is the point of the DIY or professional page. Stop if the hub will not join the network after you have checked the band, the password, and the distance to the router. Fees and what survives without a plan are on the no monthly fee page.

Common questions

Where do I put the keypad?
On the inside of the door you use, within the entry delay, not at the far end of an instant zone. You should be able to reach it before the delay ends, with the door shut behind you. The panel itself sits on an internal wall as a rule of thumb, close enough for the radio to see the furthest sensor. A keypad in a locked cupboard is a keypad you will not use.
How long should the exit delay be?
Long enough for you to leave and shut the door, and short enough that a visitor does not get a minute of silence. Time the walk. The Yale HSA listing states 20 seconds. SimpliSafe's own default exit delay is 60 seconds, and Ring allows 0 to 180 seconds. A CPVAN unit felt too short at about 3 seconds for one reviewer. Use your kit's range, not another brand's default.
How close does the door magnet need to be?
Close enough that the panel shows closed when the door is shut, and open when it is not. The TOWODE bullets say under 10 mm. If the reading flickers when the door is latched, the gap is too wide or the two halves are not aligned. Fix that before the adhesive sets.
Where should a PIR not point?
Not at glass, a radiator, a sunny floor, or a pet the listing never allowed for. A corner that looks across the room is the usual starting point, as a rule of thumb, and the walk-test is the check. If it trips when you are still at the keypad, move it. Height follows the sheet in your box, because these listings do not share one figure.
How do I test without annoying neighbours?
Use chime or test mode for the walk, and tell anyone who can hear the box before the first full siren. One short full test, with the external sounder included if you have one, is enough to know it works. Repeating it through the evening is how you get a complaint and a system you are then afraid to arm.
What if the sensor will not pair?
Check the isolation tab and the battery first. Pair it on the table, next to the panel, before you mount it at the far end of the house. If it pairs on the table and drops out on the wall, the range or the wall is the problem, not the sensor. A metal shed and a stone party wall both do this. A second unlinked siren is not a fix for a sensor that cannot see the hub.

Related pages

Sources

Public UK sources from the research digest, checked for this page on 20 October 2026. Listing prices, stars, and review counts are amazon.co.uk figures from 19 October 2026.

  1. NPCC security systems policy, March 2024 (retrieved 19 October 2026)
  2. NPSA home security systems (retrieved 19 October 2026)
  3. Which? burglar alarms and smart security systems (retrieved 19 October 2026)
  4. SimpliSafe UK plan options, 29 June 2026 (retrieved 19 October 2026)
  5. Harbro, wireless alarms and grades (retrieved 19 October 2026)
  6. DC Fire & Security, wireless burglar alarms (retrieved 19 October 2026)
  7. Ring UK, which alarm plan (retrieved 19 October 2026)
  8. amazon.co.uk listings for the twelve ASINs in this comparison (retrieved 19 October 2026)